Module 16: Implementing Disaster Recovery in Microsoft Windows Server 2016/2019
Disaster Protection Features in Windows
Disaster protection features in Windows are designed to help safeguard systems and data against hardware failures, system crashes, and other unexpected events. Key features include System Restore, which allows users to roll back their system to a previous stable state, and Backup and Restore, which enables scheduled backups of files, system images, and configurations. Volume Shadow Copy provides the ability to restore previous versions of files, while Windows Recovery Environment (WinRE) offers tools like Startup Repair, Command Prompt, and System Image Recovery for system repair and troubleshooting. Together, these features help ensure quick recovery and minimal downtime in the event of a system failure.
- Fault-Tolerant Volumes
Fault-tolerant volumes in Windows are disk configurations designed to protect data by ensuring continued access even if a hardware failure occurs. These volumes use disk mirroring (RAID 1) or disk striping with parity (RAID 5) to duplicate or distribute data across multiple physical disks. In mirrored volumes, data is written identically to two disks, so if one fails, the other continues operating. In RAID-5 volumes, data and parity information are spread across three or more disks, allowing recovery if a single disk fails. These fault-tolerant setups enhance system reliability and data integrity, making them ideal for critical applications and enterprise environments.
- Advanced Startup Options
Advanced Startup Options in Windows provide a set of diagnostic and repair tools that help troubleshoot and fix system issues. Accessible during boot or from the recovery environment, these options include Startup Repair (to fix boot problems), Safe Mode (to start Windows with minimal drivers and services), System Restore (to revert the system to a previous restore point), and Command Prompt (for advanced troubleshooting using command-line tools). Other features include System Image Recovery, which lets users restore a complete system backup, and Startup Settings, where you can enable debugging, boot logging, and disable driver signature enforcement. These tools are essential for recovering from critical errors and maintaining system stability.
- Recovery Console
The Recovery Console is a command-line tool in older versions of Windows (like Windows 2000 and XP) used for repairing and recovering systems that fail to boot properly. It allows administrators to access the file system, manage services, repair the Master Boot Record (MBR), and replace damaged system files. Common commands include fixboot, fixmbr, chkdsk, and copy. Unlike the full Windows interface, the Recovery Console provides a minimal environment focused purely on troubleshooting. It’s especially useful for resolving startup issues, recovering data, or performing advanced system repairs when Windows cannot start normally.
- Backup Utility
The Backup Utility in older versions of Windows (like Windows XP and 2003) is a built-in tool that allows users to create copies of important files, system settings, and even entire drives to protect against data loss. It supports full, incremental, and differential backups, enabling flexible backup schedules based on user needs. The utility can also back up the system state, which includes critical system files, registry settings, and Active Directory (in domain controllers). Backups can be saved to local drives, network locations, or tape devices. In case of system failure or data loss, the Backup Utility makes it easy to restore files and system configurations to a previous, working state.
Using Fault-Tolerant Volumes in Microsoft Windows Server
Fault-tolerant volumes are disk configurations that ensure data integrity and availability in the event of hardware failure. Windows Server offers several software-based fault-tolerance options through Dynamic Disks.
Types of Fault-Tolerant Volumes in Windows Server:
1. Mirrored Volume (RAID 1)
Description: Duplicates data across two disks.
Fault Tolerance: If one disk fails, the other contains an exact copy.
Best For: OS drives, critical data
Setup:
Use Disk Management or PowerShell to create a mirrored volume on two dynamic disks.
2. RAID-5 Volume
Description: Stripes data and parity across three or more disks.
Fault Tolerance: Can survive the failure of one disk.
Best For: Read-intensive environments (e.g., file servers)
Note: Only available on Windows Server (not on Windows client editions).
Setup:
Requires 3+ dynamic disks.
Use Disk Management > “New RAID-5 Volume”
How to Create a Mirrored Volume:
Open Disk Management
Right-click on unallocated space on Disk 1 → New Mirrored Volume
Select a second disk (Disk 2) to mirror
Assign drive letter and format (NTFS recommended)
- Implementing Fault-Tolerant Volumes
Option
Select Disks
Volume Size
Assign a Drive Letter or Path
Format Volume
Description
The dynamic disks that will participate in the volume (two disks for a mirrored volume; at least three for a RAID-5 volume)
The amount of unallocated space to use on each selected dynamic disk
A drive letter or path for the volume
The formatting options for the volume
- Recovering a Failed Mirrored Volume
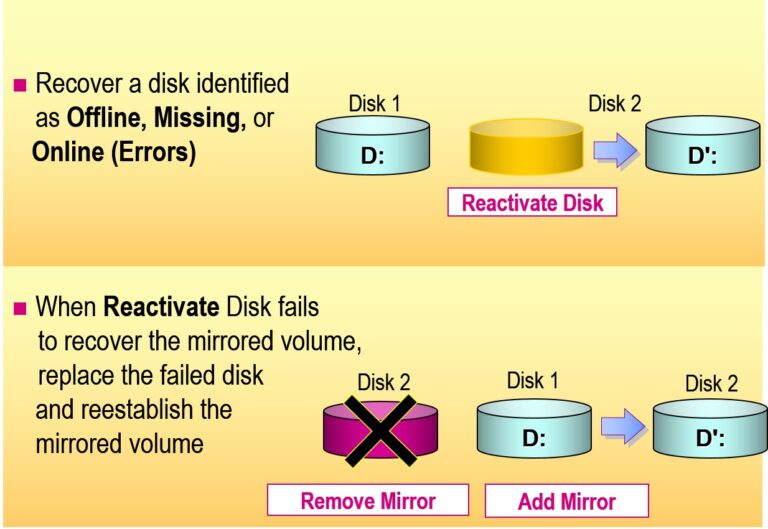
Using fault-tolerant volumes in Windows involves configuring disk setups that protect data from hardware failures by ensuring redundancy. Common types include mirrored volumes (RAID 1) and RAID-5 volumes. To use them, you must convert your disks to dynamic disks through Disk Management. A mirrored volume writes identical data to two disks, so if one fails, the other continues to operate without data loss. A RAID-5 volume spreads data and parity across three or more disks, allowing recovery from the failure of any one disk. These configurations are ideal for servers or critical systems where uptime and data integrity are essential.
- Recovering a Failed RAID-5 Volume
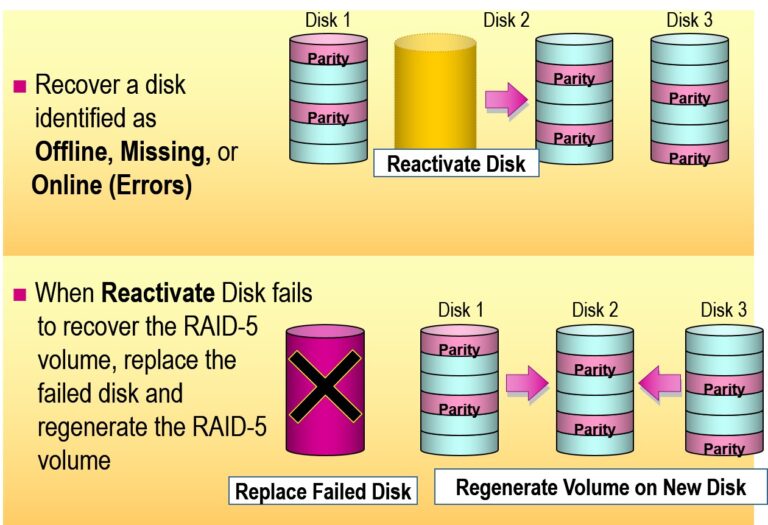
Recovering a failed RAID-5 volume in Windows involves identifying and replacing the failed disk, then restoring the volume to a healthy, fault-tolerant state. First, open Disk Management to locate the failed disk, which will be marked as “Missing” or “Failed.” Physically replace the faulty drive with a new one and convert it to a dynamic disk if required. Then, right-click the degraded RAID-5 volume and select Repair Volume, choosing the new disk as the replacement. Windows will automatically begin rebuilding the RAID-5 set by redistributing data and parity information to the new disk. Once completed, the volume will return to a healthy state, ensuring continued redundancy and data protection.
Examining Advanced Startup Options
Safe Mode
Safe Mode with Networking
Safe Mode with Command Prompt
Enable Boot Logging
Enable VGA Mode
Last Known Good Configuration
Directory Services Restore Mode
Debugging Mode
Loads basic devices and drivers
Loads safe mode options and networking services and drivers
Loads safe mode options but starts a command prompt instead of the graphical user interface
Logs the loading and initialization of drivers and services
Loads the basic VGA driver
Uses the last known good configuration to start the computer
Allows Active Directory restoration on domain controllers
Enables debugging
Examining the Recovery Console
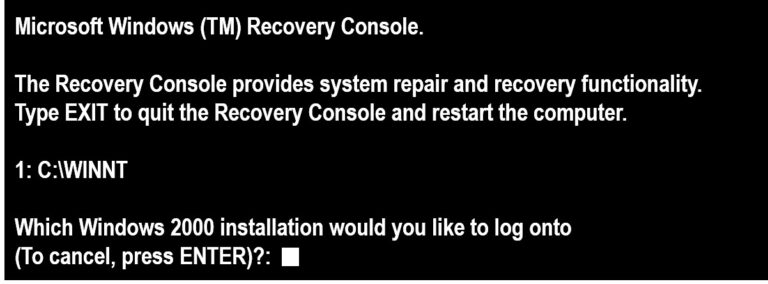
Examining the Recovery Console involves understanding how it provides a command-line environment for troubleshooting and repairing Windows when the system fails to boot. Available in Windows 2000 and XP, it allows administrators to perform essential tasks like fixing the boot sector (fixboot), repairing the Master Boot Record (fixmbr), checking disk integrity (chkdsk), enabling/disabling services, and copying or replacing system files. The Recovery Console is accessed by booting from the Windows installation CD and selecting the repair option. It offers limited access to the file system for security but is a powerful tool for resolving critical startup and system issues when normal booting isn’t possible.
- Use the Recovery Console To:
- Start and stop services
In the Recovery Console, you can start or stop services to troubleshoot system issues, especially when a service is preventing Windows from starting properly. Use the enable and disable commands to change the startup state of a service or driver. For example, disable servicename stops a problematic service from loading at boot, while enable servicename can re-enable it. These commands are useful when a service is causing system crashes or hangs. Although you cannot directly start or stop a service like in the full Windows environment, modifying their startup state allows you to control their behavior during system recovery.
- Read and write data on a local drive
In the Recovery Console, you can read and write data on a local drive by accessing the system’s file system through the command line. You use basic file management commands like copy, del, and mkdir to read and modify data. For example, copy C:\file.txt D:\backup\ will copy a file from the C: drive to the D: drive, while del C:\temp\file.txt will delete a file. You can also navigate the file system using the cd (change directory) command. While the Recovery Console offers limited access to the file system for security reasons, it allows essential file operations for data recovery or system repairs.
- Format hard disks
In the Recovery Console, you can format hard disks using the format command, which allows you to erase and prepare a disk for use. This is particularly useful when you need to start fresh with a clean disk. The command syntax is: For example, format C: would format the C: drive, erasing all data on it. You can also add options like /fs:ntfs to specify the file system format (NTFS). Be cautious when using the format command, as it permanently deletes all data on the specified drive, which cannot be recovered unless you have a backup. This action is often used when you’re reinstalling the operating system or cleaning up a disk for reuse.
Using the Backup Utility in Microsoft Windows Server
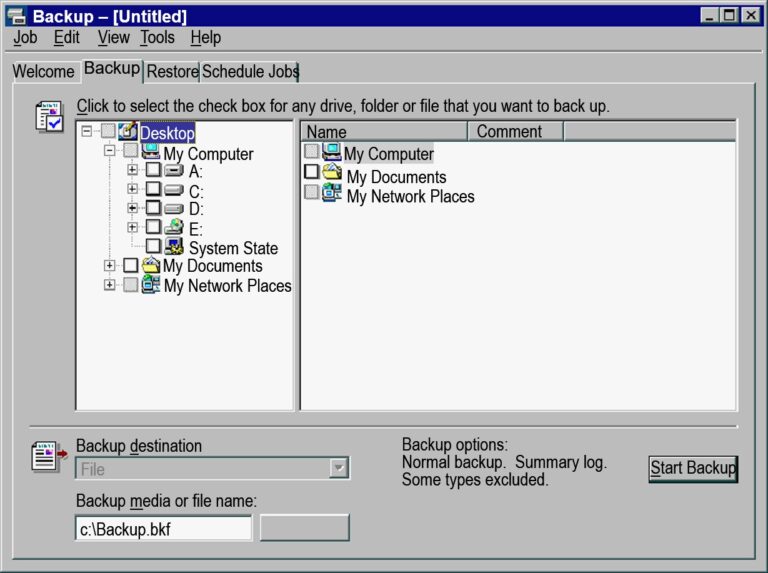
The Backup Utility (also known as Windows Server Backup or NTBackup in older versions) is a built-in tool used to protect data, create system state backups, and recover critical information in case of failure or corruption.
- Backing Up Files and Folders
In the Recovery Console, you can back up files and folders using the xcopy or copy commands. These commands allow you to manually copy important files to another drive or external media in case of system failure.
- Backing Up System State Data
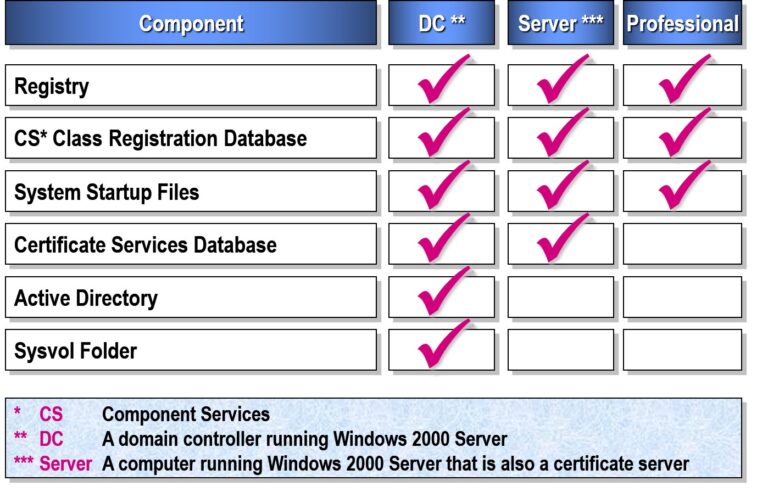
Backing up System State data involves creating a copy of critical system information, such as the registry, boot files, and system settings, that are essential for recovering the operating system. In Windows, this includes files like the Active Directory (on domain controllers), system files, and the registry. This backup allows you to restore the system to its current configuration in case of a system failure, ensuring minimal data loss and faster recovery. It can be performed using backup utilities like the Windows Backup tool or through command-line tools in the Recovery Console.
- Scheduling a Backup
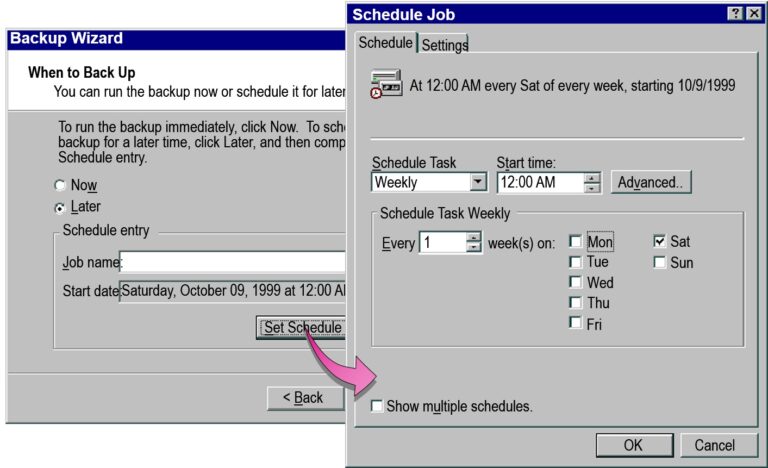
Scheduling a backup in Windows allows you to automate the process of regularly backing up important files and system data without manual intervention. You can schedule backups using the Backup and Restore utility or Task Scheduler. In Backup and Restore (available in Control Panel), you can select the files, folders, or system image you want to back up and choose a frequency (daily, weekly, etc.). Using Task Scheduler, you can set up custom backup tasks by running specific backup commands at designated times. This ensures your data is consistently protected without needing to remember to perform backups manually.
- Restoring Files and Folders
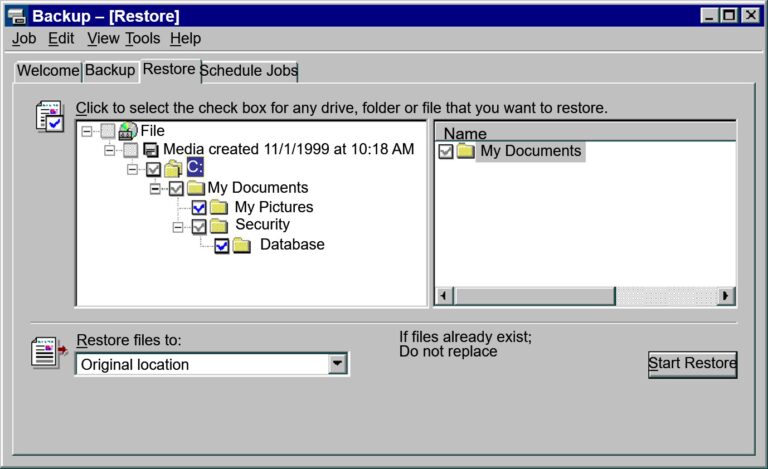
Restoring files and folders in Windows can be done using the Backup and Restore utility or by manually copying from a backup location. If you used the built-in backup tool, you can go to Control Panel > Backup and Restore, and select Restore my files to recover specific files or folders from your backup. If you’re using a previous version of a file, you can right-click the file or folder, choose Restore previous versions, and select a version from your backup or system restore points. In case of a system image backup, you can restore the entire system to a previous state using the System Image Recovery option in the Advanced Startup menu.
- Restoring Active Directory
Restoring Active Directory (AD) involves recovering the AD database, which includes all user accounts, groups, policies, and other directory information. This can be done using Windows Server Backup or Directory Services Restore Mode (DSRM).
- Restoring Active Directory on a Failed Domain Controller
Restoring AD requires careful attention, as improper restoration could lead to data loss or inconsistencies, especially if there are changes after the backup was taken. Always ensure that the backup is up-to-date and tested for recovery.
- Restoring a Damaged Active Directory Database
Restoring a damaged Active Directory (AD) database involves recovering the AD data from a backup or repairing it using Directory Services Restore Mode (DSRM). After booting into DSRM, you can restore the AD database (ntds.dit) from a System State backup using Windows Server Backup. Depending on the situation, you may perform an authoritative restore to ensure that the restored data is replicated across all domain controllers. This process helps recover from corruption or damage to the AD database.
- Start computer in Directory Services Restore Mode
Directory Services Restore Mode (DSRM) is a special boot mode used to restore or repair a damaged Active Directory database. To start a computer in DSRM, reboot the server and press F8 during startup. From the advanced boot options menu, select Directory Services Restore Mode. This mode starts the server without loading Active Directory services, allowing administrators to safely restore the AD database, repair corruption, or perform other maintenance tasks on the AD system. DSRM is crucial for performing AD recovery operations without interfering with the running directory services.
- Restore system state data from backup file
Restoring system state data from a backup file involves recovering critical system components, such as the registry, boot files, Active Directory (on domain controllers), and other essential system configurations. Using Windows Server Backup or a similar tool, you can restore the system state from a previously created backup. This process is typically done in Directory Services Restore Mode (DSRM) on a domain controller or during system recovery on other servers. Restoring system state ensures that the system is returned to its previous configuration, maintaining the integrity and functionality of key operating system components.
- Performing an Authoritative Restore
Performing an Authoritative Restore in Active Directory involves restoring specific AD objects, such as user accounts or organizational units, to a previous state and ensuring they are replicated across all domain controllers. This process is typically done after a system state backup is restored in Directory Services Restore Mode (DSRM). After restoring the backup, you use the ntdsutil tool to mark the restored data as authoritative. This forces replication of the restored objects, making them the “master” version that will overwrite any conflicting data on other domain controllers. This method is useful when specific AD objects have been accidentally deleted or modified and need to be restored and replicated.
- Restoring Active Directory on a Failed Domain Controller
Restoring Active Directory on a failed domain controller involves recovering the AD database and system settings from a backup to bring the domain controller back online. First, boot the server into Directory Services Restore Mode (DSRM) by pressing F8 during startup. Once in DSRM, restore the System State backup, which includes the Active Directory database (ntds.dit), SYSVOL, and other essential components, using Windows Server Backup or another backup tool. After the restore, use the ntdsutil tool for any necessary post-recovery steps, such as performing an authoritative restore to ensure the restored data is replicated correctly across other domain controllers. This process helps recover a failed domain controller while maintaining Active Directory consistency.
- Run ntdsutil.exe
Running ntdsutil.exe is used for performing advanced Active Directory management tasks, such as repairing the AD database, authoritatively restoring deleted objects, or performing metadata cleanup.
- Type authoritative restore
The authoritative restore command in ntdsutil.exe is used to restore specific Active Directory objects, such as user accounts or organizational units, after they have been deleted or modified. After restoring a system state backup in Directory Services Restore Mode (DSRM), running the authoritative restore command marks the restored objects as authoritative, meaning they will overwrite any conflicting data on other domain controllers during replication. This ensures that the restored objects are propagated across the network, making them the master copies. It is typically used in recovery scenarios to ensure data consistency across the domain.
- Specify subtree to restore
The Specify Subtree to Restore option in ntdsutil.exe allows you to target specific portions of the Active Directory database, or subtrees, for restoration. This is useful when you only need to restore certain objects, such as specific organizational units or user accounts, without affecting the entire directory. By specifying the subtree, you can avoid restoring unnecessary data and ensure that only the required AD objects are recovered. This option helps streamline the recovery process and limits the impact on the overall Active Directory environment.

Add comment