
Module 7: How to Deploy Windows 10/11 Clients Using Remote Installation Services (RIS) or Windows Deployment Services (WDS) on Windows Server
Why this works:
“How to Deploy”: Matches popular Google queries.
“Windows 10/11 Clients”: Adds specificity for modern systems.
“RIS/WDS on Windows Server”: Covers both legacy (RIS) and current (WDS) tech, improving search reach.
Trains on job-relevant skills for sysadmins, IT support, and infrastructure roles.
Examining Remote Installation Services (RIS) in Microsoft Windows Server
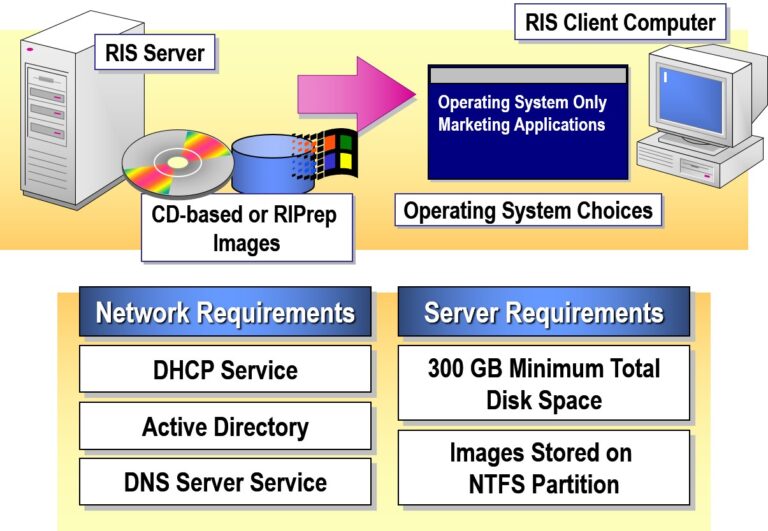
Remote Installation Services is a feature developed by Microsoft that allows administrators to remotely deploy the Windows operating system over a network. RIS enables client computers without an operating system to boot from the network and connect to a RIS server, which provides an image of the OS for installation. RIS enables client computers without an operating system to boot from the network and connect to a RIS server, which provides an image of the OS for installation. This eliminates the need for physical media and speeds up the deployment process across multiple systems, especially in enterprise environments.
Installing an RIS Server
To install a Remote Installation Services (RIS) server, first ensure the server runs Windows Server 2012 or 2016, is part of an Active Directory domain, and has DHCP, DNS, and an NTFS partition ready. Install RIS via Add/Remove Windows Components in the Control Panel. Once installed, run the risetup command to launch the configuration wizard. You’ll specify the folder location for OS images, configure initial client support settings, provide the source installation files, name the image folder, and add a friendly description and help text for client identification. Finally, authorize the RIS server in the DHCP console to allow it to respond to PXE boot requests.
- Configuring and Starting RIS Provide the Setup Wizard with:
- RIS Provide the Setup Wizard with:
During the configuration of Remote Installation Services (RIS), the Setup Wizard prompts for several key details to prepare the server for remote deployments.
- Folder location for images and supporting files
First, you’ll specify the folder location on an NTFS partition where RIS will store operating system images and all necessary supporting files—this location must have ample disk space.
- Initial client support settings
Next, you’ll define the initial client support settings, deciding whether the RIS server will immediately respond to PXE client requests or wait until manually enabled later.
- Location of source files
Then, the wizard asks for the location of the source files, typically a Windows installation CD or its directory, which will be used to create the initial OS image.
- Initial image folder name
You must also assign an initial image folder name to help organize the setup files within the RIS directory structure.
- Friendly description and Help text
Lastly, you provide a friendly description and help text, which will appear to end users during network boot—this information helps users identify the correct OS image and understand what it’s for (e.g., “Windows 10 & 11 for Office PCs – 32/64-bit”).
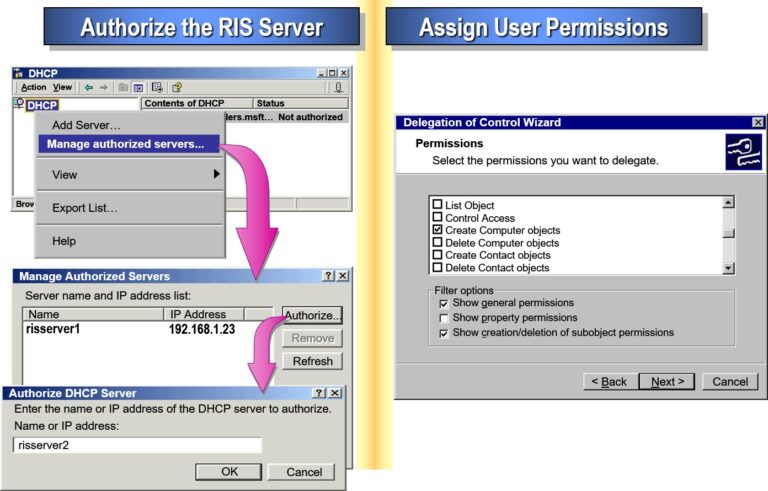
- Authorizing the RIS Server and User Accounts
Authorizing the RIS server ensures it can provide installation services within a network. This is done through the DHCP Management Console, where the server must be explicitly authorized to respond to PXE boot requests. For security and control, only authorized domain user accounts with appropriate permissions can create and manage RIS images. Additionally, user accounts must have the right to install the operating system on client machines, ensuring that only trusted administrators can deploy systems via RIS.
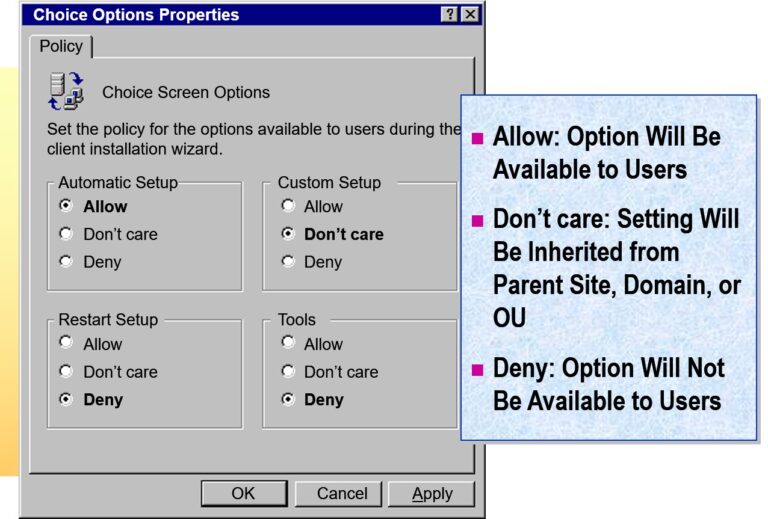
Configuring Remote Installation Options in Windows Server
Configuring Remote Installation options involves setting how the RIS server interacts with client computers during network boot. Administrators can choose to respond to all PXE requests, only known clients (pre-staged in Active Directory), or require manual approval. These settings help control who can access installation services and enhance security. Additionally, administrators can customize the installation process, such as enabling automatic naming conventions for client computers and specifying which OS images are available to different user groups.
- Configuring Client Computer Names and Locations
Configuring client computer names and locations in RIS helps automate and organize the deployment process. During setup, administrators can define naming conventions using variables like username, MAC address, or sequential numbers to ensure each computer gets a unique and consistent name. They can also specify the Active Directory container (such as an OU) where the new computer accounts will be created, allowing better management and grouping of systems within the domain. This streamlines administration and supports structured deployments across the organization.

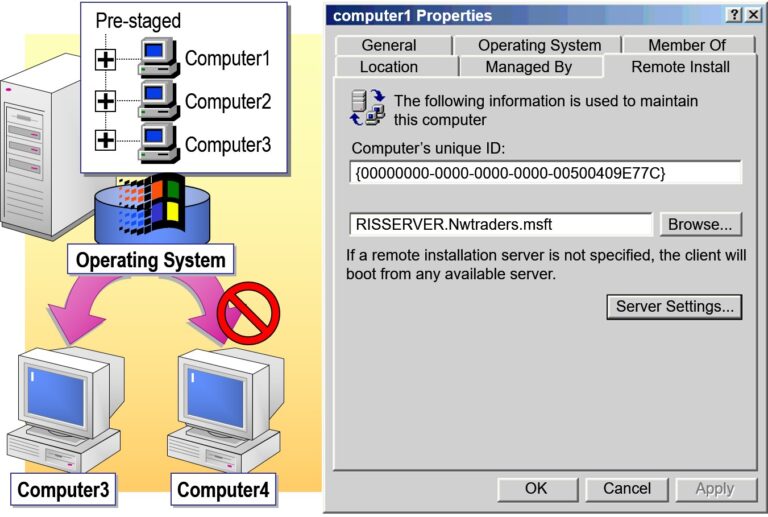
- Pre-staging Client Computers
Pre-staging client computers in RIS involves creating computer accounts in Active Directory before deployment. This links a specific client machine—identified by its GUID or MAC address—to a predefined computer account. By doing this, administrators can control which systems are allowed to use RIS, apply specific installation settings, and ensure the machine joins the correct organizational unit (OU) during setup. Pre-staging enhances security and allows for more customized, controlled deployments.
- Configuring Client Installation Options
Configuring client installation options in RIS allows administrators to customize how operating systems are deployed to client machines. They can set up automated or manual installation modes, define answer files (unattended setup scripts), and assign specific OS images based on user roles or departments. Additional options include configuring regional settings, setting default user profiles, and pre-installing applications. These configurations streamline the deployment process, reduce manual input, and ensure consistency across all installed systems.
- Configuring Maintenance and Troubleshooting Utilities
Configuring maintenance and troubleshooting utilities in RIS involves setting up tools that help diagnose and resolve issues during the installation process. Administrators can enable utilities such as network diagnostic tools, disk partitioning utilities, and remote management tools to assist with troubleshooting failed installations. Additionally, RIS allows for the creation of bootable utilities that can be used for system recovery or to repair installations. These tools ensure that any issues encountered during the installation process can be quickly addressed, minimizing downtime and ensuring smooth deployment.

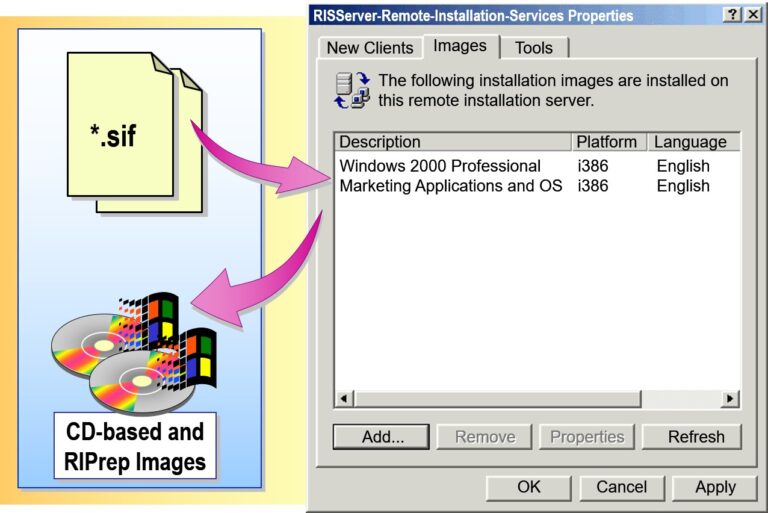
Deploying Images Using Remote Installation Services (RIS) in Windows Server
Deploying images using RIS involves selecting a pre-configured operating system image and deploying it to client computers over the network. Once the RIS server is set up and authorized, client machines boot via PXE (Preboot Execution Environment), automatically connecting to the RIS server. The administrator then selects the appropriate image, and the system begins installation, applying the image to the client machine’s hard drive. This process is automated, requiring minimal user interaction, and can be further customized with answer files for an unattended installation, ensuring consistency and efficiency across large-scale deployments.
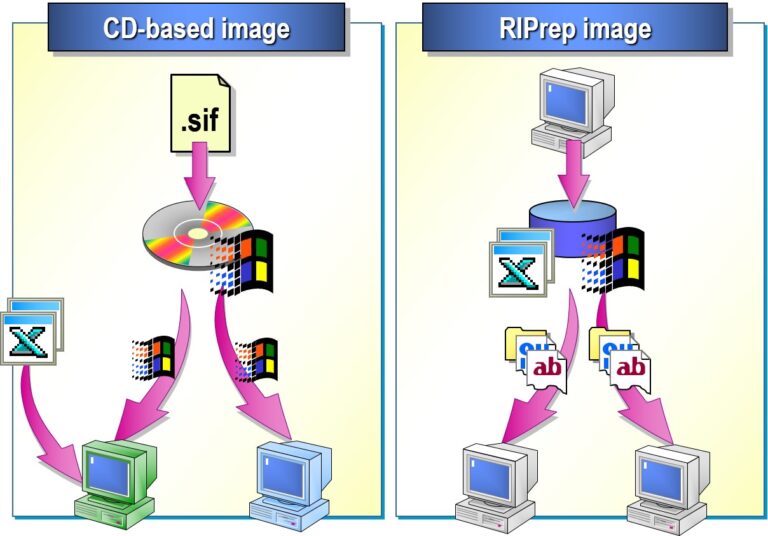
- Modifying the Installation of a CD-Based Image
Modifying the installation of a CD-based image in RIS involves updating or customizing the image to meet new deployment requirements. After capturing the image from a Windows installation CD, administrators can modify it by adding or removing software, changing system settings, or applying security patches. To do this, the image must be mounted and edited in a suitable environment, such as using a Windows Preinstallation Environment (PE) or a virtual machine. Once modifications are complete, the updated image is recaptured and stored on the RIS server for future deployment, ensuring that the new configuration is applied to all client machines during installation.
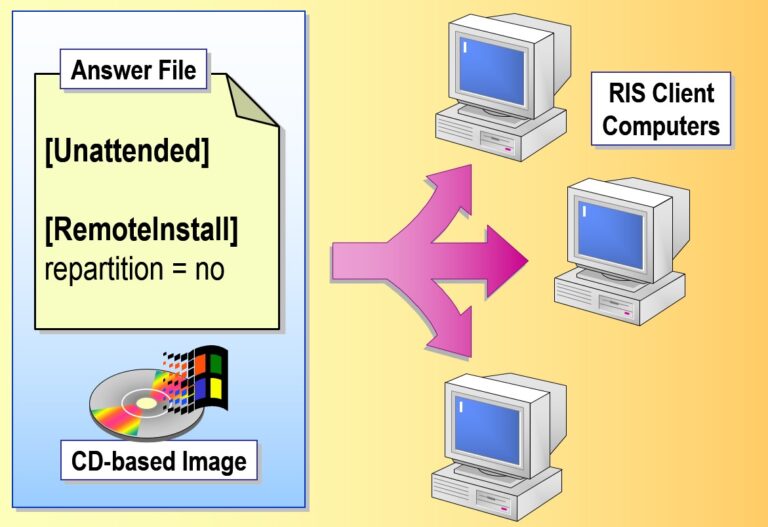
- Associating an Answer File with an Image
Associating an answer file with an image in RIS enables automated, unattended installations by providing pre-configured responses during the OS setup process. An answer file contains predefined settings, such as language preferences, regional settings, network configurations, and user account information, which are applied automatically during installation. To associate an answer file with an image, the administrator specifies the file within the RIS management interface. This ensures that when the image is deployed, the client machine receives the exact configuration defined in the answer file, eliminating the need for manual input and streamlining the installation process.
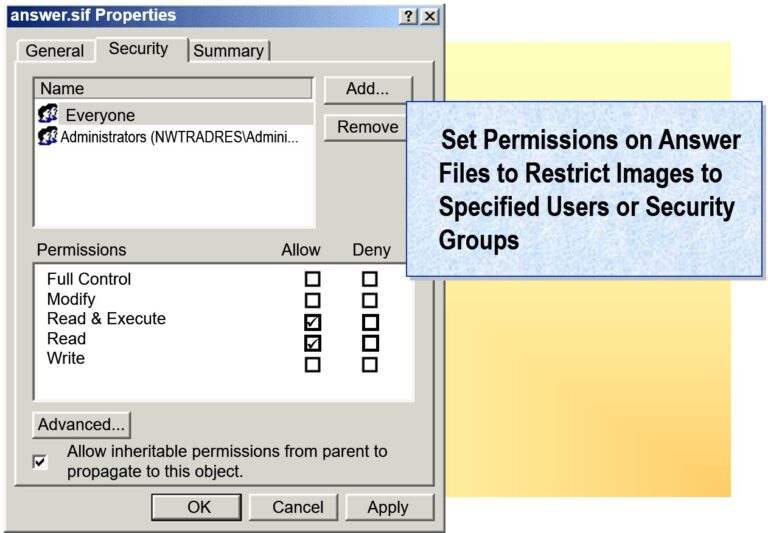
- Restricting Images
Restricting images in RIS involves controlling which operating system images are available for deployment to specific client machines. Administrators can limit access to certain images based on factors such as the computer’s MAC address, Active Directory container, or security group. This ensures that only authorized users or specific machine types receive particular images, enhancing security and preventing unauthorized deployments. Restrictions can be set through the RIS management interface, where the administrator can configure which images are available to different clients, ensuring tailored and secure installations across the network.
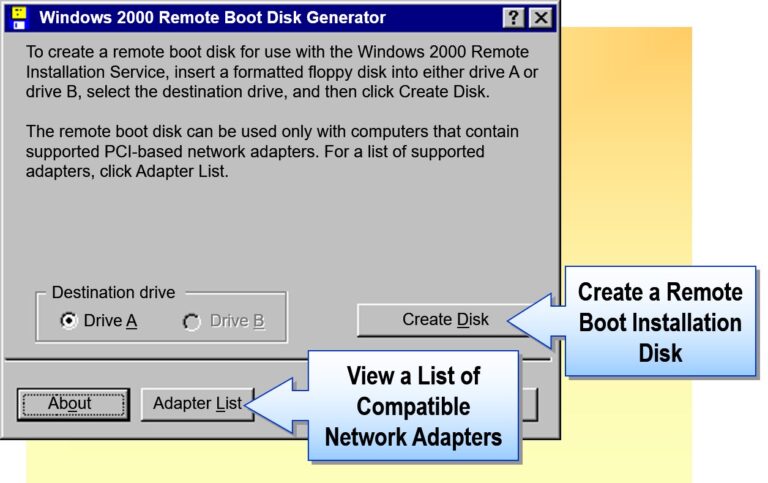
- Creating an RIS Startup Disk
Creating an RIS startup disk involves creating a bootable disk that allows client computers to boot from the network and initiate the installation process when they are not yet configured with an operating system. This startup disk contains essential network drivers and the necessary tools to connect to the RIS server, enabling the client to download the OS image over the network. To create the RIS startup disk, administrators use the RIS management tools to generate the disk, which can then be used on client machines that don’t support PXE boot. Once booted, the client machine automatically contacts the RIS server to begin the installation process.
- Installing an Image on an RIS Client Computer
Installing an image on an RIS client computer involves booting the client machine from the network using PXE (Preboot Execution Environment). Once the client machine is powered on, it requests a boot image from the RIS server. The administrator selects the desired OS image from the RIS server, and the installation process begins automatically. The RIS server transfers the image to the client’s hard drive, applying the operating system and any associated configurations. Depending on the setup, the installation can be fully automated using an answer file, allowing for an unattended setup with minimal user interaction.
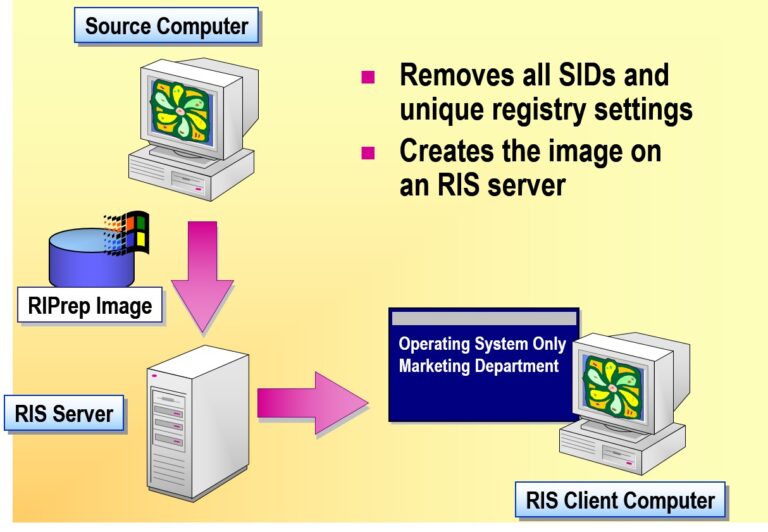
Creating an RIPrep Image
Creating an RIPrep (Remote Installation Preparation) image involves capturing a customized installation of Windows, including all system settings, applications, and configurations, to be used for deployment via RIS. To create an RIPrep image, you first set up a reference computer by installing Windows and configuring it with the desired settings and software. Once the configuration is complete, you use the RIPrep command to capture the image of the reference computer. This image is then stored on the RIS server, where it can be deployed to other client machines over the network. The RIPrep image allows for faster deployment of standardized systems across multiple clients, maintaining consistency in software and configurations.
- Setting Up a Source Computer
Setting up a source computer for RIS involves preparing a reference machine that will serve as the model for creating OS images to be deployed to other client systems. The source computer should be configured with the desired operating system, applications, updates, and system settings that you want to replicate across multiple machines. After configuring the source computer, the next step is to ensure it is properly prepared for imaging by running a sysprep (System Preparation) tool to remove unique identifiers like SID and hardware-specific settings. Once the source computer is ready, it can be captured and converted into an image using tools like RIPrep or ImageX to be stored on the RIS server for deployment.
- Install Windows 10 Professional
- Configure Components and Settings
- Install and Configure Applications
- Test the Operating System and Application Configurations
- Modifying the Default User Profile
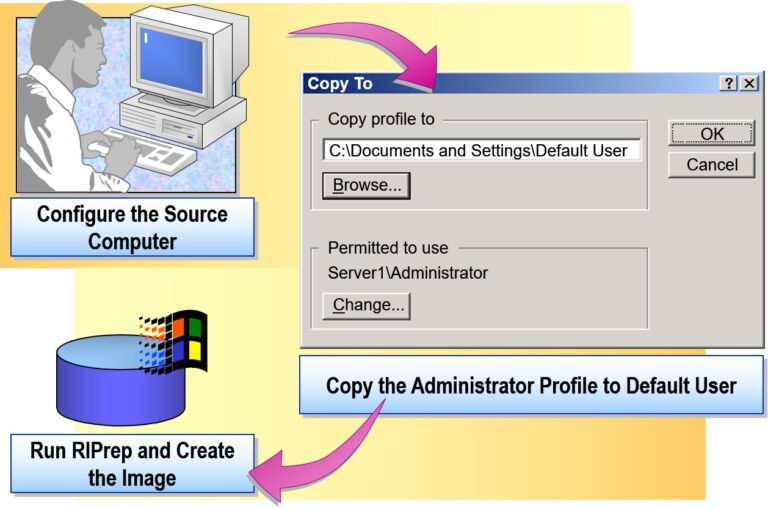
- Creating an Image by Using the Remote Installation Preparation Wizard
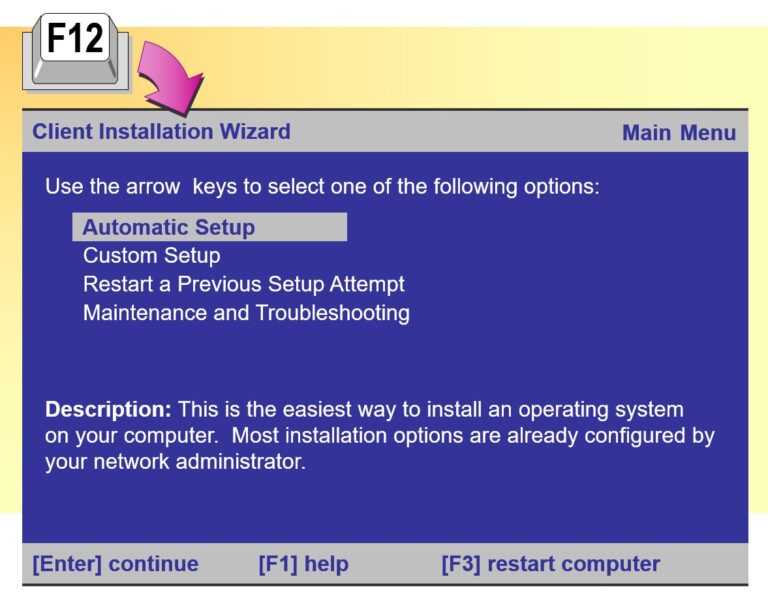
- Client Computers Do Not Get Past the BootP Message
- Client Computers Do Not Get Past the DHCP Message
- Client Computers Do Not Get Past the BINL Message
- Computer Cannot Connect by Using a RIS Boot Disk
- You Press F12, But the Computer Cannot Connect to the Server
- Expected Installation Options Are Not Available to a User


Add comment